Softether VPN on EC2 (ubuntu)
I try to make a vpn server on EC2
Environments
Instance
t2.micro
Note: You should set Elastic ID
Security Group
Add this rule to Inbound
- Custom UDP Rule UDP port:500 from 0.0.0.0/0, ::/0
- Custom UDP Rule UDP port:4500 from 0.0.0.0/0, ::/0
OS
NAME="Ubuntu"
VERSION="18.04.3 LTS (Bionic Beaver)"
SoftEther VPN
Version 4.32 Build 9731
Basically step
sudo apt update
sudo apt upgrade
sudo apt install make build-essential
Make Softether Vpn
I choose v4.32-9731-beta,
You should find a suitable version in release page.
release
mkdir -p ~/src/vpnserver/
wget https://github.com/SoftEtherVPN/SoftEtherVPN_Stable/releases/download/v4.32-9731-beta/softether-vpnserver-v4.32-9731-beta-2020.01.01-linux-x64-64bit.tar.gz
tar zxvf  softether-vpnserver-v4.32-9731-beta-2020.01.01-linux-x64-64bit.tar.gz
cd vpnserver
yes 1 | make
Install it
sudo mkdir /usr/local/vpnserver
sudo cp hamcore.se2 /usr/local/vpnserver/
sudo cp vpm* /usr/local/vpnserver/
sudo chown -R root:root /usr/local/vpnserver/
sudo chmod 700 /usr/local/vpnserver/*
Set up systemd
Make /etc/systemd/system/vpnserver.service
/etc/systemd/system/vpnserver.service
[Unit]
Description=SoftEther VPN Server
After=network.target auditd.service
ConditionPathExists=!/usr/local/vpnserver/do_not_run

[Service]
Type=forking
EnvironmentFile=-/usr/local/vpnserver
ExecStart=/usr/local/vpnserver/vpnserver start
ExecStop=/usr/local/vpnserver/vpnserver stop
KillMode=process
Restart=on-failure

# Hardening
PrivateTmp=yes
ProtectHome=yes
ProtectSystem=full
ReadOnlyDirectories=/
ReadWriteDirectories=-/usr/local/vpnserver
CapabilityBoundingSet=CAP_NET_ADMIN CAP_NET_BIND_SERVICE CAP_NET_BROADCAST CAP_NET_RAW CAP_SYS_NICE CAP_SYS_ADMIN CAP_SETUID

[Install]
WantedBy=multi-user.target
Running
sudo systemctl daemon-reload
sudo systemctl enable vpnserver
sudo systemctl start vpnserver
Set up VPN
Run vpncmd
$ sudo ./vpncmd
vpncmd command - SoftEther VPN Command Line Management Utility
SoftEther VPN Command Line Management Utility (vpncmd command)
Version 4.32 Build 9731   (English)
Compiled 2020/01/01 18:16:55 by buildsan at crosswin
Copyright (c) SoftEther VPN Project. All Rights Reserved.

By using vpncmd program, the following can be achieved.

1. Management of VPN Server or VPN Bridge
2. Management of VPN Client
3. Use of VPN Tools (certificate creation and Network Traffic Speed Test Tool)

Select 1, 2 or 3: 1
Select 1
Specify the host name or IP address of the computer that the destination VPN Server or VPN Bridge is operating on.
By specifying according to the format 'host name:port number', you can also specify the port number.
(When the port number is unspecified, 443 is used.)
If nothing is input and the Enter key is pressed, the connection will be made to the port number 8888 of localhost (this computer).
Hostname of IP Address of Destination:

If connecting to the server by Virtual Hub Admin Mode, please input the Virtual Hub name.
If connecting by server admin mode, please press Enter without inputting anything.
Specify Virtual Hub Name:
Connection has been established with VPN Server "localhost" (port 443).

You have administrator privileges for the entire VPN Server.
Create Hub
type this
VPN Server>HubCreate test
and enter HUB’s password .
VPN Server>HubCreate test
HubCreate command - Create New Virtual Hub
Please enter the password. To cancel press the Ctrl+D key.

Password: ******************
Confirm input: ******************


The command completed successfully.
Select Hub
type this
VPN Server>HUB test
and select the HUB
VPN Server>HUB test
Hub command - Select Virtual Hub to Manage
The Virtual Hub "test" has been selected.
The command completed successfully.

VPN Server/test>
Create user
I ignored GroupName, FullName and Description type this
VPN Server/test>UserCreate mizuki
and press return key without input
VPN Server/test>UserCreate mizuki
UserCreate command - Create User
Assigned Group Name:

User Full Name:

User Description:

The command completed successfully.
Set password
type this
VPN Server/test>UserPasswordSet
and set a password
VPN Server/test>UserPasswordSet
UserPasswordSet command - Set Password Authentication for User Auth Type and Set Password
User Name: mizuki

Please enter the password. To cancel press the Ctrl+D key.

Password: *********
Confirm input: **********

The command completed successfully.
Enable IPSec
type it
VPN Server/test>IPsecEnable /L2TP:yes /L2TPRAW:no /ETHERIP:no /DEFAULTHUB:main
and get result as follows:
VPN Server/test>IPsecEnable /L2TP:yes /L2TPRAW:no /ETHERIP:no /DEFAULTHUB:main
IPsecEnable command - Enable or Disable IPsec VPN Server Function
Pre Shared Key for IPsec (Recommended: 9 letters at maximum): **********************

The command completed successfully.

VPN Server/test>SecureNatEnable
SecureNatEnable command - Enable the Virtual NAT and DHCP Server Function (SecureNat Function)
The command completed successfully.
Dhcpset
type it
VPN Server/test>Dhcpset /Start:192.168.30.10 /End:192.168.30.200 /Mask:255.255.255.0 /Expire:7200 /GW:192.168.30.1 /DNS:192.168.30.1 /DNS2:none /Domain:none /Log:yes /PushRoute:"10.0
and get result as follows:
VPN Server/test>Dhcpset /Start:192.168.30.10 /End:192.168.30.200 /Mask:255.255.255.0 /Expire:7200 /GW:192.168.30.1 /DNS:192.168.30.1 /DNS2:none /Domain:none /Log:yes /PushRoute:"10.0
.0.0/255.255.0.0/192.168.30.1"
DhcpSet command - Change Virtual DHCP Server Function Setting of SecureNAT Function
The command completed successfully.
Connect it
In macOS, Open 🍎 on upper left -> System Preferences... -> Network.
Click + on lower left, and make a new service.
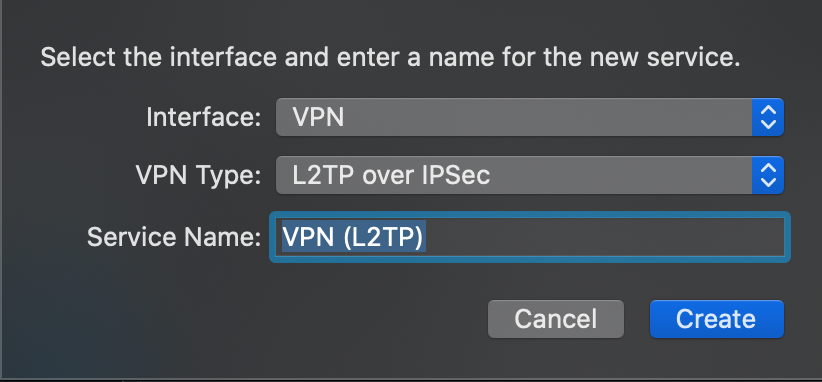 Service Name may be
 VPN on AWS?
Input base info
Server Address: EC2 IP address
Account Name: <Created user name>@<Hub name>
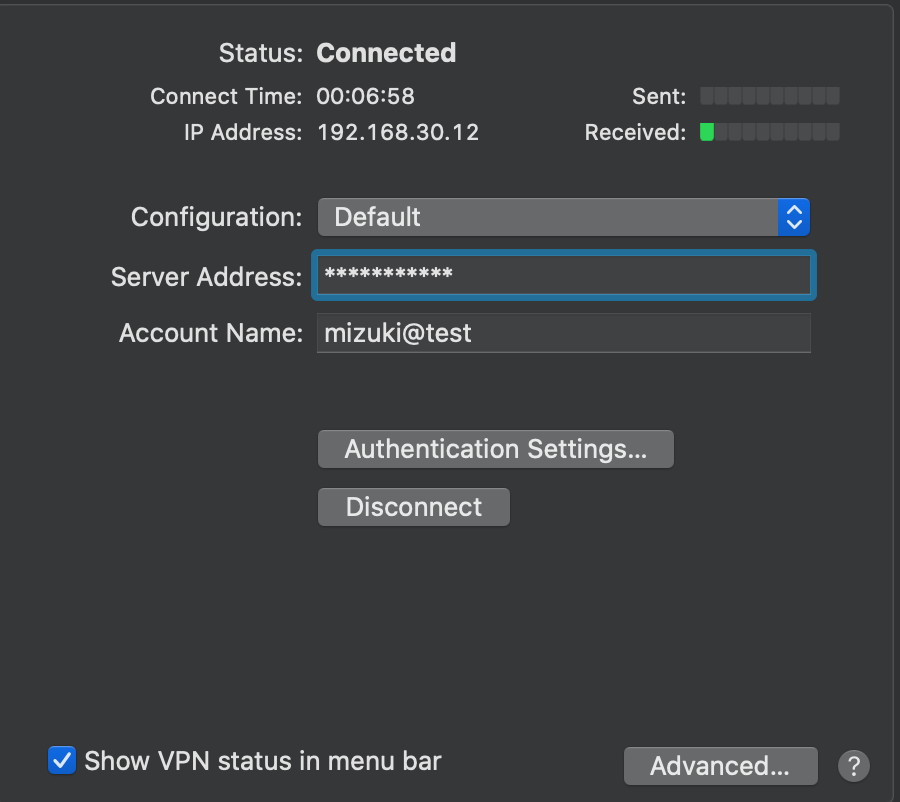
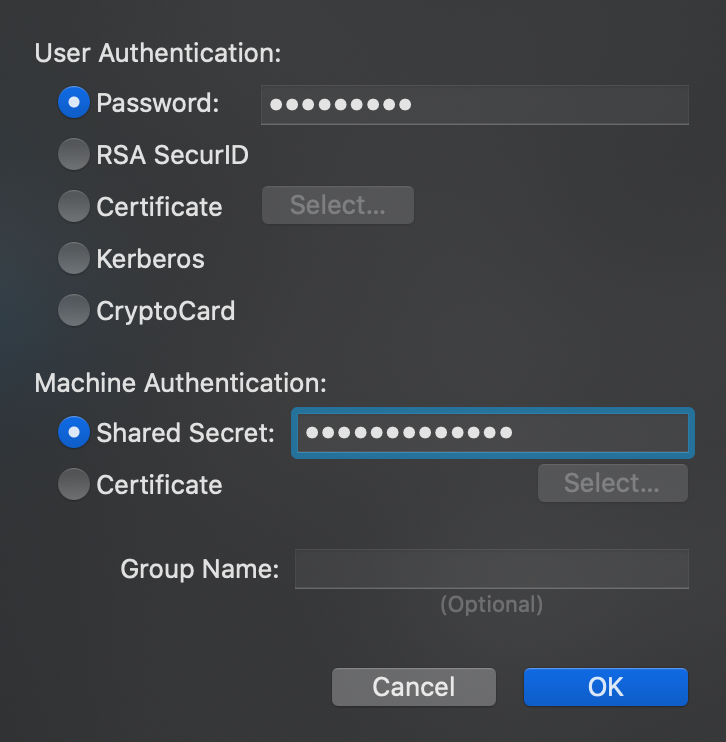
Input auth info
Enter the password you have set using UserPasswordSet,
Shared Secret is key same as Pre Shared Key for IPsec
Connect
Press connect